A chronicle of my first car and its journey back to life.
25 Years and counting.
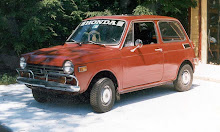
25 years ago at the age of 15 I dragged home a broken down car. A 1972 Honda 600 Sedan. Two cylinder, air cooled sedan that looks alot like an old Minicooper but oh so much cooler. The last time I drove this car was the spring of 1987. I always intended to fix it up more but life happens and in my grandparents garage she sat waiting. Fast forward 25 years and it's time to finish what I started and bring her back to life.
Summer is a busy time for our family, we spend a lot of time at camp and when we are home there are always things to do around the house. I was able to find some time to patch the rust in the driver's front wheel well.
Fitting the patch panel
Finished and welded in place.
I also started on the floor pan, this is a shot of the front drivers seat mounting location, i had to recreate the recessed area where the seat bolts as well as teh surrounding area.
A better shot of the repair waiting for grinding and final welding. These were not fun to make, thankfully only two of them are rusted out the other 6 mounting locations are in fine shape.
Here is my brake master cylinder when I took it out of the parts car and tore it down. I was able to remove everything except for the internal piston. After 20 years of sitting it was frozen in there pretty well.
I sent it off to Joe at Sierra Specialty Automotive and this is what I got back a few days ago. First its cleaned, from the looks of it bead blasted to a like new finish. Next, Joe hooks it up to a hydralic pump to remove the internal piston. The inside of the cylinder is then bored out to receive a brass sleave that is then pressed into it. The inside is then bored and polished to the correct diameter and the port holes are drilled.
Picture of the brass sleave.
The last picture is of the cylinder, the pistons that came out and need to be cleaned up and a rebuild kit I got from Miles.
Thanks for such great work Joe. As always thanks to Miles for the parts and your never ending help.
A new chapter has begun. I have started the body work on the 600. My goal is to get the bottom of the car in perfect shape before moving on to cosmetic body work. Today I started with the passengers front wheel well. The bottom rear corner was rusted through.
But first a couple of pics of the car on the spinner I made to work on it.
Floor pan with the majority of the undercoating removed for rust inspection.
Floor pan again.
This is the drivers wheel well and it looks like the passnegers wheel well did before I stared.
Here is the repaired wheel well. I need to finish welding but this gets it pretty much done.
I will be completing one side at a time, for now the passengers side floor pan then move on to the drivers side. Once I fix the majority of the rust holes, of which there a a few along the bottom, I will be replacing the rocker panels then moving onto the rear portion of the car which has mostly surface rust. Once all the floor pan issues are fixed I will media blast the entire pan and wheel wells inside and out and DP epoxy primer it.
My master brake cylinder and the rebuild kit for it are due this week, stay tuned for pictures.
I have been working on the remainder of my parts taht need blasting and painting. I expect to receive my rebuilt master cylinder this week from Sierra. I also have the exhaust bolted up and need to make some new gaskets. I plan on running the engine before I intall it, when I do I will post a video of it.
In the mean time here are a few old photos I found.
We got back form our family spring vacation yesterday. Obviously I have no Honda update but plan on working on it this week after work. The body is on the rotisserrie and will be moved into the garage next for body work. I will post some pics as soon as i get it in the garage.
This weekend was spring clean up so not much to report. I did get a chance to mount the body back on the rotissourie but thats about it. I misplaced my camera so I don't have any pictures yet. I am really looking looking forward to starting the body work.
So here it is. I finally mated the engine to the subframe after they had been apart for over 10 years. The engine is slowly being reassembled and has most of the accessories back on. It took a lot of effort to get to this point and I'm really excited to start on the bodywork soon.
On Saturday I had time to go to my folks place and get the engine for the Honda. I rebuilt it years ago in their basment and its been there ever since just waiting. Here it is in the trailer waiting to be unloaded. It's attached to a bracket I made that fits a traditional engine stand. It can be rotated in two axis.
A picture of it back on the stand.
Here is the subframe all ready to recieve the engine. I built a cart for it so it can be moved around and used to help assemble it. I am painting the last of the engine mounts and brackets and hope to get the engine on the frame next weekend.
I also have the tires and wheels ready for mounting. 5 fresh wheels and 5 Kumho tires.
Next up after the engine is instaled on the frame is to mount the engine cooling fan, get a new fan belt, install the points and condensor, install the starter, rebuilt axle shafts, lower control arms etc. Plus I am still waiting to hear from Joe about my master cylinder.
I recieved a few more parts from Miles I needed. The first photo is of gas tank mounting bolts and isolation rubber grommets. Above left is a carb rebuild kit from Bruce. Thanks for the quick shipment on that!
These are grommets for the cooling shrouds on the side of the engine.
Dan pointed me to JC whitney for these almost like original Poly bushings. Notice the original bushing (black) has that big knob on it. No idea why but the new redones will work fine. The distance between the center of the bar hole and where the bushing touches the frame is a little off. I will shim this with some steel as this distance is critical for front wheel orientation. Correct steering geometry is critical.
Spring is here and Saturday was fantastic 70 degrees and sunny. We spent the day cleaning out my grandparents house of 60+ years of collected stuff. Had a lot of family and friends to help and it was much appreciated. Sunday I painted a bunch of parts and stacked the rest of teh chord wood we had delivered last month. Expecting some more parts this week and hoping to get the honda body back on the rotissorie so I can get it in the garage. That will be much more fun and interesting than all this littel stuff.
Things have progressed slowly this week. I am waiting for the weekend to paint up a bunch of parts I have blasted, also orders a few misc. parts from Miles and a carb kit from Bruce. My pile of brackets nuts and bolts is almost complete to send to the plater.
Ever notice the weekends seem too short. I made some time on Sunday to work on the Honda, I seem to spend a lot of time sorting parts. Building a car is a lot like a big puzzle except you have to prep and fix and paint every piece of the puzzle. I have Roughly 8 or 10 complete brake calipers for the front of these cars. Ive been dissassembling them inorder to dertermine which parts are in the best shape for the rebuild. Here is one of the front caliper assemblies I took apart.
My bin of brake parts needed for the rebuild is getting more complete all the time.
These are the mounts that the flexible hoses and the hardlines join too. One is all cleaned up the other as it came off the car. This hardware will get new Yellow Zinc coating.
This photo shows the NOS rear whell cylinders I have had for the past 20 years just waiting to get installed. the original that came out is next to it.
I am sending off my Master Cylinder today. I never did get the internal piston free. Joe from Sierra claimes he can get it out with some hydralic pressure.I expect in a few weeks it should be sleaved and in perfect condition again.
Last night I had a chance to dig into the last big piece of my brake system. One of my objectives in getting this rebuild done is to get individual systems ready for assembly on the car once the body is done. My first big task has been the brakes. Somewhere I have other brake master cylinders but none that I could find. Regardless any MC thats been sitting around for this many years will need rebuilding and because of the corrosion you get with DOT 3 brake fluid (made from glycol which absorbes moisture) often the MC needs to be sleeved to work properly. So here is a 13/16 bore MC from my parts car before dissassembly.
After I removed all the external parts I have to remove the checkvalves and attempt to free the internal piston.
A little wire brush and it tells you the bore right on the side of the cylinder.
Here are all the parts I removed, if you ever do this type of project save every part nomatter its condition and take as many photos as you need to reassemble it.
This photo shows the assembly of the check valves and which port they go in. Since the car has front disk brakes and rear brum brakes the check valves are differant and need to be reassembled in the correct places. After this picture they went in individual bags with labels. The photo is for reassembly later.
So what now? Well what happens almost every time with a car like this is someone gets in the car and pressed the defunct brakes and the internal piston gets stuck inside and continues to corrode and get more and more stuck, since glycol dysolves in water, I am soaking the MC in a jug of water and will attempt to remove it later. After its removed it will be sent off to Sierra Specialty Automotive to have it sleeved. More pictures once I get the piston free.
Here is quick video Miles made showing this entire process.
I love getting parts in the mail. Received a package from Miles today with a new rear brake hose, some yellow cad wire looms, exhaust gaskets and brake hardware. Also the pile of rusty bits and pieces is getting smaller and the shelves are filling up with etched and primed parts waiting for a final coat of detail paint. I will try to get a photo of the shelves with all the parts soon.
Years ago I spotted a 600 sedan behind a garage in a nearby town, I approached the owner and asked if I could buy it. The sedan, originally red, was painted yellow and had the shop name and number on the side. The owner had used it as a sign years before but had retired it to the back of the shop. We struck a deal and I brought it home picking parts as I needed them, if it had not been missing so many parts I might have kept it intact.
Saturday morning I went to my grandparents to pick up the parts car. I brought it home the 65 miles to my place and stripped the last remaining usable parts off it. Sunday I brought the remains to the local recycle yard. One of the yard dudes said a local guy "has a bunch of these cars". Im now attempting to sind this guy. Seems like everyone knows someone who has one of these cars but the truth be told just about everyone of these folks I've met has something like it but not a Honda 600.
I discovered recently that Kumho has discontinued the 10" tires they make. Years ago I bought 4 new Kumho tires in anticipation of my restoration. Last week I ordered a fifth tire to use as a spare. I purchased it from Mini Mania I am hoping to get them mounted and balanced this weekend. If I do more pictures to follow.
I have a pile of parts that need refinishing before I move onto the body work and painting of my sedan. A tote full of parts on one side of the blast cabinet and a stack of clean parts waiting for self etching primer on the other. Here are some photos of the many parts Ive done to date.
The fan is done in VHT High temp raw Aluminium paint like the engine (pictures coming soon).
Some of the parts waiting to be blasted.
One of the things I like about blasting parts is it reveils the history of the part. Many times while I'm doing it stamped numbers and symbols appear. Its pretty cool.
I really like having a small blast cabinet to strip these parts. It would be almost impossible without it. I recommend anyone who is thinking about restoration to get one.
Going thru some old pictures stored on various cd's I found some of the work I did in the past on the car at various times.
Engine removal.
This is a pictue I took about 5 or 6 years ago when I rebuilt the engine. There wasn't really anything wrong with the engine, infact it only has 45k miles on it, but I really wanted to clean it up and regasket the entire thing. On teardwon I discovered a broken piston ring, but aside from that it was mostly a cosmetic rebuild.
Some parts that I had sand blasted ready for DP primer.
Shot of my car on the dolly
I have to take some updated pictures, many of the parts here have been transformed into fresh and painted waiting to go back on the painted shell. I hope to start on the shell in a few months when the weather is warmer.


.JPG)
.JPG)


.JPG)
.JPG)

.JPG)
.JPG)